Tuesday, November 1, 2016

SCAP Extensions for Configuration Manager

The SCAP Extensions tool will let you convert XML's that are SCAP 1.0 or 1.2 / DataStream SCAP 1.2 Compliant into Configuration Manager (ConfigMgr 2012+)  usable Configuration Item \ Configuration Baseline packages ( DCM CAB's).

I did not have a ton of luck finding a straightforward, step by step instruction set for this, and the documentation left me a bit confused (nothing new to see here folks!). My biggest issue was finding a usable baseline and dictionary.

If you are interested in security, involving a ConfigMgr environment, I cannot stress enough how valuable the Microsoft Security Compliance Manger (SCM) is: https://technet.microsoft.com/en-us/solutionaccelerators/cc835245.aspx


Where's what I got, where I got it, and how I ran it.


  • SCAP Extensions 3.0 Announcement: Click Here
  • SCAP Extensions Download (v3.0.1157.0): Click Here
  • SCAP Extensions Documentation: Click Here
    • SCAP Extensions only supports .XML that include XCCDF (SCAP 1.0 and 1.1)/DataStream SCAP1.2 content.
    • Doc's point you to checklists that meet the above criteria here: Click Here (very generic link)


Let's do a Windows 10 Baseline!


  • Download and install SCAP Extensions per documentation (install, next…next installation process).
    • The install will create a link in the Start Menu called "SCAP Extensions" within "SCAP Extensions" leading to a command prompt sitting at "C:\Program Files (x86)\SCAP Extensions".
    • However, since you need to have an Admin level privilege to make changes in that subfolder, you'd right-click the link to start it as Administrator, but that will dump you in "C:\Windows\System32".
    • Just be aware that it will do that.
  • Review info about the Benchmark we are using: Click Here
  • Download the checklist, from the page listed above (Windows 10 Benchmark STIG Version 1, Release 3, SCAP 1.1 Content): Click Here
  • Extract all 4 XML files to "C:\Program Files (x86)\SCAP Extensions\"
    • Obviously, this can be done more cleanly, use a sub-folder at least, network share would be a good practice.
  • Within "C:\Program Files (x86)\SCAP Extensions\" create the subfolder "DCM_CABS"
  • Open an Admin level command prompt to "C:\Program Files (x86)\SCAP Extensions\"
  • Run: "C:\Program Files (x86)\SCAP Extensions>scaptodcm -xccdf U_Windows_10_V1R3_STIG_SCAP_1-1_Benchmark-xccdf.xml -cpe U_Windows_10_V1R3_STIG_SCAP_1-1_Benchmark-cpe-dictionary.xml -out .\DCM_CABS"

Watch some sweet scrolling text of status updates and progress!


  • Within the subfolder "DCM_CABS" you'll find a file "Windows_10_STIG.cab".
  • Then take this file, and import it via the ConfigMgr DCM import tool.

The rest is pretty self-explanatory \ out of scope for this write up. Enjoy!

Friday, January 8, 2016

Someone has a file open.

So, they moved the GUI in 2012r2 to show who has a file open.

I have no idea where it went, and I'm sure there are a billion ways to do it on the interwebs.

001
Get-SmbOpenFile | Where-Object -Property Path -EQ 'DriveLetter:\Folder\Path\Here'


Play with Get-SmbOpenFile and it's friends Close-SmbOpenFile, Close-SmbOpenSession, Block-SmbShareAccess.

Ton of utility there.

Thursday, January 7, 2016

Wireless Disabled on Server 2012r2

Wireless networking is disabled (feature not installed), by default on Windows 2012r2.

Quick Google =
http://blogs.technet.com/b/blainbar/archive/2012/09/14/getting-your-windows-server-2012-to-use-wireless-not-best-practice-but.aspx

Easy fix. But why do it in the GUI?

PowerShell!

Get-WindowsFeature Wireless*
#Confirm that "Wireless-Networking is not installed (available).
Install-WindowsFeature Wireless Networking 

You'll have to restart, and after you do, if there are issues, you might need to change the "WLAN AutoConfig" service off "manual".

...and this is probably a bad thing to have in production..something...something not a best practice.

Install-WindowsFeature is actually a really interesting cmdlet.

You can within that cmdlet, do things like -ForceRestart and -Source. Source will let you specify a network UNC path, a repo specified by GPO, local system, VHD, or the venerable Windows Update.

So if you go so far as to establish a well known GPO with the repo, you can never ever need to have media available (doesn't come up much, but it does for things such as .NET 3.5 needing to be installed in 2012r2).

The kicker really is that it (centralized sources) will become more and more needed as server slims down and attack surfaces are reduced through simply reducing the amount of components installed.

Wonder if this will be merged into One-Get in the future.

Wednesday, December 30, 2015

Primary Devices of a User Collection

One of the limitations (to my knowledge) within ConfigMgr's console, is the ability to cross views easily in reference to the SQL DB.

I've wanted, for awhile, to be able to take a User Collection, and generate a Device Collection that are the Primary devices those users are set to.

This is what I've come up with so far as a new view in SQL.

001
002
003
004
005
006
SELECT dbo.vCollectionMembers.SiteID AS CollectionID, dbo.vCollectionMembers.Name AS Username, dbo.v_R_System_Valid.Netbios_Name0 AS DeviceName
FROM   dbo.v_UsersPrimaryMachines INNER JOIN
       dbo.v_R_User ON dbo.v_UsersPrimaryMachines.UserResourceID = dbo.v_R_User.ResourceID INNER JOIN
       dbo.v_R_System_Valid ON dbo.v_UsersPrimaryMachines.MachineID = dbo.v_R_System_Valid.ResourceID RIGHT OUTER JOIN
       dbo.vCollectionMembers ON dbo.v_R_User.Name0 = dbo.vCollectionMembers.Name
WHERE  (dbo.vCollectionMembers.SiteID = N'XYZ123456'AND (dbo.vCollectionMembers.ArchitectureKey = '4')

I also popped this together, a list of all users, and their assigned Primary Devices.

001
002
003
004
005
SELECT dbo.v_R_User.Unique_User_Name0 AS [User], dbo.v_R_System_Valid.AD_Site_Name0, dbo.v_R_System_Valid.Netbios_Name0 AS ComputerName
FROM   dbo.v_UsersPrimaryMachines INNER JOIN
       dbo.v_R_User ON dbo.v_UsersPrimaryMachines.UserResourceID = dbo.v_R_User.ResourceID RIGHT OUTER JOIN
       dbo.v_R_System_Valid ON dbo.v_UsersPrimaryMachines.MachineID = dbo.v_R_System_Valid.ResourceID
WHERE  (dbo.v_R_User.Unique_User_Name0 <> N'NULL')

Next, I'll put together a little PowerShell function to get this list of Devices, and then place them in a Collection.

Fancy!

Now I fully expect to be shown how this is something do-able in one or two simple clicks within the console. :)

Friday, November 13, 2015

Using PowerShell to Query a Site Server

Quick little example of how to use Get-WMIObject to pull data from the Primary (or CAS?).

This is useful since sometimes it's very easy to put together a query in SQL Managlement Studio, the WQL translates very closely.

Enjoy!

001
002
003
004
005
006
007
008
009
010
011
012
013
014
015
016
017
FUNCTION Get-SCCMSqlQuery
{
    Param([parameter(Mandatory=$true)]$ApplicationName,$CollectionName,$SiteName,$SCCMPrimary)
        $SCCMWMI="root\sms\site_$SiteName"
    Get-WmiObject -namespace $SCCMWMI -computer $SCCMPrimary -query "SELECT AssignmentID,
    Assignment_UniqueID,CollectionID,CollectionName,ApplicationName FROM SMS_ApplicationAssignment
    WHERE ApplicationName LIKE '$ApplicationName' AND CollectionName
    LIKE '$CollectionName'"
 | Select-Object ApplicationName,CollectionName,AssignmentID
}

$App = 'TestApp'
$Collection = 'TestCollection'

#Example Returns
 Get-SCCMSqlQuery -ApplicationName $App -CollectionName $Collection -SiteName 'XYZ' -SCCMPrimary 'contoso.website.com'
(Get-SCCMSqlQuery -ApplicationName $App -CollectionName $Collection -SiteName 'XYZ' -SCCMPrimary 'contoso.website.com').AssignmentId

Thursday, October 8, 2015

ISESteroids Version Control

I have little background in programming, code development and best practices.

My skillset in PowerShell developed by playing continually and trying to cover a need.

As a result I have a large folder of trials, tests, failures, terribly filed notes about tests. 

Incredibly painful to use and navigate.

I bet quite a few people have this same thing going on.

Any programmers that look at it probably feel this way:


This directory content will probably look familiar to some folks!


DoSomethingTest.ps1
DoSomethingTest2.2.ps1
DoSomething1.2.ps1
DoSomethingDraftTest.ps1
DoSomethingDraftTestnotes12.txt
Trythis.ps1
Something Do This To A Thing.ps1

So, a folder of junk.


Versioning was a cool idea.

A concept that I never was taught and I never stopped and took the time to learn.

Terrible habits I developed

Deliberately not saving due to just wanting to test something out.
That whole File>SaveAs was just too much work.
Rambling non-descriptive file names.

Installing the trial of ISESteroids changed everything!


Totally a game changer for me.

After a few hours of clicking around I stumbled on...

“Toggle Script File Versioning Management Tool”


I’m sorry….whats this!?


I saved a script and started playing.

Here’s how it works.


Your initial save does not do anything in this pane.


Check off “Auto Mode” for now and change something in your script.


Hit F5 to run the script.


Let’s change another thing, and make another save.


Oh my goodness! What’s this! I’ll go through what I understand.


Automatic


Upper right, this version was created via auto mode (I’ll get to manual in a moment).

Delete


Deletes this version.

Notes


You can add your own notes to the version, these notes are not saved in the script itself.

Open


This opens the version in a new tab within ISE so you don’t lose what you were actually working on. Note that you need to resave this version as a new file and turn versioning on if you want to sort of branch off.


Compare


Big one here!

Click Compare on Version .01 and you jump right into WinMerge!

This isn’t a guide on how to use WinMerge, but it’s pretty intuitive.

If you make a change, go to File > Save and you can commit your change.


Then when you close WinMerge, PowerShell_ISE will prompt you to reload the file.


Note that by reopening the file in this way, it’s now your current saved version.

It doesn’t create another minor version.

Another note. If you have WinMerge open, you cannot interact with the ISE window until it’s closed.
I thought that ISE had gone wonky and I was going to kill the program before it dawned on me.

Version  Development Status


Click on "Unclassified" and you’ll be able to chose the point at which the version is in development. 

Alpha > Beta > Stable > Internal > Release

Please know that is the sequence in which I see development is ordered, that may not be correct.

Manual Mode?


So, we’ve used Auto Mode, and understand what we’re seeing up there in the pane.

Let’s look at manually adding a version.

Click “Add New Version”


Add New Major Version


Notice how all our saves are small increases? (0.1 -> 0.2 -> 0.3)

This will increment the version in full versions (1.x -> 2.x -> 3.x).

Add New Minor Version


Similar to major version, this just adds a non automatic (non triggered by saving) minor version.

I also noticed if you bump past Version 0.9 it neatly goes to Version 0.10, 0.11 and so on.

Very nice! Another neat thing is that if you delete versions along the way, it remembers what they were, and doesn’t try to “fill in the blank” when you make a new version.


Add New Major Version and Remove Minor Versions


This creates a new V x.00 and deletes ALL the 0.xx versions listed.

You can click cancel and it will just create the Major Version.


Open History Archive in Explorer


Now you can discover how ISESteriods is actually performing all this magic!

Hit this and you will be pointed to a ZIP file sitting in the same folder as your saved (current) PS1.

Opening and extracting this zip will give all the versions you have created as plain old PS1 files.

The “index” file is an XML and with all the creation time, username and notes you created!

Side note! If you want a visual tool to help play with XPath searches check out:

(and note that the menu is hidden, hit Alt and you can add an XML to work with)

Final Words


If I possessed a bit of forethought, I would have looked and seen this blog entry was more concisely written in these locations:

Regardless, go get ISESteriods today and start trying it out! 10 day trial is worth it.

Wednesday, August 19, 2015

E-Mail when OSD Complete

We had a requirement to allow HelpDesk Analysts to image computers, and try to keep it fairly secure, and also let a group of people know, via email that the deployment had completed successfully.

Since at least SCCM 2007, there have been scripts triggered off of Status messages to perform this task.

These are the excellent guides I followed to get this up and running. The main two are these here, blended together.

  • http://www.systemcenterdudes.com/sccm-osd-send-email/
  • http://servertechs.info/remove-client-from-collection-after-successful-sccm-task-sequence-powershell/

The environment is SCCM 2012r2 CU4 running on Windows Server 2012r2.

Outside of SCCM

Create a Service Account in AD - "SVC-SCCM-RemovalAdmin"


On your Primary Server, in Windows

Add the Service Account to the Primary Site Server Local User Group "Remote Management Users"

We will presume you keep your scripts in this location on the Primary Server: C:\Scripts

Put these two files there (Ryan Norton @ ServerTechs.info had these on his page).

CallScriptAsOtherUser.ps1
    • Edit Username
    • Edit Script Paths!

001
002
003
004
005
006
007
008
009
010
011
012
013
014
015
016
017
018
019
020
021
022
023
024
025
026
027
028
029
030
031
032
033
034
035
036
037
038
039
040
041
[CmdletBinding()]
    Param(
        [Parameter(Mandatory=$True)][string[]]$Collections,
        [Parameter(Mandatory=$True)][string]$SiteCode,
        [Parameter(Mandatory=$True)][string]$ClientName
         )
##############################################
#Enter the username of the service account below: (domain\username)

$Username = "DOMAIN\SVC-SCCM-RemovalAdmin"

#Enter the location of the script below
$ScriptPath = "C:\Scripts\CollectionRemovalScript\RemoveCollectionRule.ps1"

#Enter the location of the credentials file below
$CredFile = "C:\Scripts\CollectionRemovalScript\cred.txt"

##############################################

foreach ($Collection in $Collections)
{
if ($CSCollections.length -gt 0)
{
$CSCollections = $CSCollections + "," + $Collection
}
else
{
$CSCollections = $Collection
}
}

$Arguments = "-Collections " + $CSCollections + " -SiteCode " + $SiteCode + " -ClientName " + $ClientName

$Password = Get-Content $CredFile | ConvertTo-SecureString

$Credentials = New-Object -TypeName System.Management.Automation.PSCredential -argumentlist $Username,$Password

$cmd = "powershell.exe -ExecutionPolicy ByPass -Command " + $scriptPath + " -collections " + $CSCollections + " -Sitecode " + $SiteCode + " -Clientname " + $ClientName
$scriptblock = $ExecutionContext.InvokeCommand.NewScriptBlock( $cmd )

Invoke-Command -ComputerName . -ScriptBlock $ScriptBlock -Credential $Credentials


RemoveCollectionRule.ps1
    • Make sure the path to your module is correct (aka where you have SCCM itself installed locally).
    • In Send-MailMessage: Change the From, modify Subject, Recipients, and your own mail server.

001
002
003
004
005
006
007
008
009
010
011
012
013
014
015
016
017
018
019
020
021
022
023
024
025
026
027
028
029
030
031
032
#Created By Ryan Norton 21/04/2014

#Intended to be used as part of a status filter rule in SCCM 2012 (sp1 & later) to remove a client from a collection once a task sequence has completed successfully

#The script will check one or more collections to see if the specified client exists and remove it from each.

#Example usage:
#The following example will connect to site ABC, check the collections named BuildWin7SP1 & BuildWin8 for a client called TestClient1 and remove the direct membership rule if found.
#C:\Windows\SysWOW64\WindowsPowerShell\v1.0\powershell.exe -ExecutionPolicy ByPass \fileName.ps1 -Collections BuildWin7SP1,BuildWin8 -SiteCode ABC -ClientName TestClient1

[CmdletBinding()]
    Param(
        [Parameter(Mandatory=$True)][string[]]$Collections,
        [Parameter(Mandatory=$True)][string]$SiteCode,
        [Parameter(Mandatory=$True)][string]$ClientName
         )

Import-Module "c:\Microsoft Configuration Manager\AdminConsole\bin\ConfigurationManager.psd1"

cd $SiteCode":"

foreach ($Collection in $Collections)
{
    Get-CMDevice -CollectionName $Collection | select Name | ForEach-Object `
    {
            if ( $_.name -eq $ClientName)
            {
            Remove-CMDeviceCollectionDirectMembershipRule -CollectionName $Collection -ResourceName $ClientName -Force
    Send-MailMessage -From OSDActuallyCompleted@domain.com -Subject "Unit $ClientName has completed imaging and has been removed from the AnalystImaging Collection." -To Important@domain.com, AlmostAsImportant@domain.com -Body "Unit $ClientName has completed imaging and has been removed from the HelpDeskImaging Collection." -Cc someone@domain.com -SmtpServer your.server.com
            }
    }
}

I bet you saw the reference up there to the cred.txt file. You need to create that unless you like being terrible at securing anything. This is really just ripped right from Ryan Norton's page:

Make sure you have PSExec on the system.

  1. Open a Administrative Command Prompt.
  2. Run: "PSExec -i -s powershell.exe"
  3. Enter: "Read-Host -AsSecureString | ConvertFrom-SecureString | Out-File C:\Scripts\Cred.txt"
  4. Nothing will prompt you. Type the password for the Domain\SVC-SCCM-RemovalAdmin. Followed by the enter key. Very. Carefully.

Now time to jump into the SCCM Console.

Create a Collection you want to be the place people put Devices to be imaged (HelpDeskImaging).

Give the users the rights and scope to add devices to that collection. This is where you can use limiting collections to then prevent certain servers from being moved into this collection to be re-imaged. Deny beats Allow!

Create a new Security role by going to, Administration Tab - Security - Security Role. You can call it "CollectionEditor" giving only Collection Read and Modify rights. Chose appropriate Security Scope to include the Collection you want to work with (HelpDeskImaging).


Jump over to the Administration Tab - Security - Administrative Users and add the "SVC-SCCM-RemovalAdmin" account there, giving it the "Collection Editor" role. Assign security scope here if needed.


So now we have the account added, it can now actually remove members from the Collection (kinda). But it needs to be triggered.

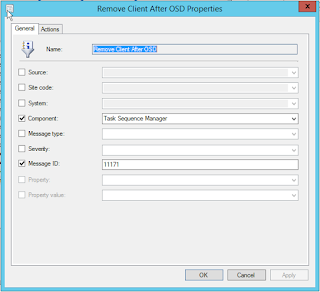
Head to Administrative Tab - Sites - Highlight your Site - Status Filter Rules.


Task Sequence Manager must be typed. It isn't on the drop down. Message ID must be 11171.

You can specify a Property + Property ID to have this only trigger for certain OSD deployments in that collection. Leave it blank to trigger on all completions within that collection(s).

Under Actions you'll need "Run a Program" filled out. Remember to use the right path for the script.

001
C:\Windows\System32\WindowsPowerShell\v1.0\powershell.exe -ExecutionPolicy ByPass -File c:\Scripts\CollectionRemovalScript\CallScriptAsOtherUser.ps1 -Collections HelpDeskImaging -SiteCode %msgsc -ClientName %msgsys

So keep in mind, the script is going to run on any completion which is triggered either for any completion (just Message ID), or specific ones (If you added Property + Value).

What changes the script sending the email or not is how you have Collections chosen in the "Run A Program" Action within the Status Message.


That's it! You should be getting alerts!

There are some nice troubleshooting links in the two links I posted above, and plenty more below.

Here are a bunch more for inspiration, troubleshooting and other methods!

http://www.systemcenterdudes.com/239/
http://www.petervanderwoude.nl/post/tweeting-the-deployment-status-of-a-system-via-orchestrator-and-configmgr-2012/
https://anothermike2.wordpress.com/2014/06/13/osdusing-ztisendmail-to-send-email-in-a-ltizti-task-sequence/
https://sccmfaq.wordpress.com/2013/05/20/sccm-2012-sp1-remove-client-from-collection-after-osd/
http://scug.be/sccm/2010/10/01/configmgr-osd-task-sequence-success-or-failure-notification/
http://servertechs.info/remove-client-from-collection-after-successful-sccm-task-sequence-powershell/