Since at least SCCM 2007, there have been scripts triggered off of Status messages to perform this task.
These are the excellent guides I followed to get this up and running. The main two are these here, blended together.
- http://www.systemcenterdudes.com/sccm-osd-send-email/
- http://servertechs.info/remove-client-from-collection-after-successful-sccm-task-sequence-powershell/
The environment is SCCM 2012r2 CU4 running on Windows Server 2012r2.
Outside of SCCM
Create a Service Account in AD - "SVC-SCCM-RemovalAdmin"
On your Primary Server, in Windows
Add the Service Account to the Primary Site Server Local User Group "Remote Management Users"
We will presume you keep your scripts in this location on the Primary Server: C:\Scripts
Put these two files there (Ryan Norton @ ServerTechs.info had these on his page).
CallScriptAsOtherUser.ps1
- Edit Username
- Edit Script Paths!
001
002 003 004 005 006 007 008 009 010 011 012 013 014 015 016 017 018 019 020 021 022 023 024 025 026 027 028 029 030 031 032 033 034 035 036 037 038 039 040 041 |
[CmdletBinding()]
Param( [Parameter(Mandatory=$True)][string[]]$Collections, [Parameter(Mandatory=$True)][string]$SiteCode, [Parameter(Mandatory=$True)][string]$ClientName ) ############################################## #Enter the username of the service account below: (domain\username) $Username = "DOMAIN\SVC-SCCM-RemovalAdmin" #Enter the location of the script below $ScriptPath = "C:\Scripts\CollectionRemovalScript\RemoveCollectionRule.ps1" #Enter the location of the credentials file below $CredFile = "C:\Scripts\CollectionRemovalScript\cred.txt" ############################################## foreach ($Collection in $Collections) { if ($CSCollections.length -gt 0) { $CSCollections = $CSCollections + "," + $Collection } else { $CSCollections = $Collection } } $Arguments = "-Collections " + $CSCollections + " -SiteCode " + $SiteCode + " -ClientName " + $ClientName $Password = Get-Content $CredFile | ConvertTo-SecureString $Credentials = New-Object -TypeName System.Management.Automation.PSCredential -argumentlist $Username,$Password $cmd = "powershell.exe -ExecutionPolicy ByPass -Command " + $scriptPath + " -collections " + $CSCollections + " -Sitecode " + $SiteCode + " -Clientname " + $ClientName $scriptblock = $ExecutionContext.InvokeCommand.NewScriptBlock( $cmd ) Invoke-Command -ComputerName . -ScriptBlock $ScriptBlock -Credential $Credentials |
RemoveCollectionRule.ps1
- Make sure the path to your module is correct (aka where you have SCCM itself installed locally).
- In Send-MailMessage: Change the From, modify Subject, Recipients, and your own mail server.
001
002 003 004 005 006 007 008 009 010 011 012 013 014 015 016 017 018 019 020 021 022 023 024 025 026 027 028 029 030 031 032 |
#Created By Ryan Norton 21/04/2014
#Intended to be used as part of a status filter rule in SCCM 2012 (sp1 & later) to remove a client from a collection once a task sequence has completed successfully #The script will check one or more collections to see if the specified client exists and remove it from each. #Example usage: #The following example will connect to site ABC, check the collections named BuildWin7SP1 & BuildWin8 for a client called TestClient1 and remove the direct membership rule if found. #C:\Windows\SysWOW64\WindowsPowerShell\v1.0\powershell.exe -ExecutionPolicy ByPass \fileName.ps1 -Collections BuildWin7SP1,BuildWin8 -SiteCode ABC -ClientName TestClient1 [CmdletBinding()] Param( [Parameter(Mandatory=$True)][string[]]$Collections, [Parameter(Mandatory=$True)][string]$SiteCode, [Parameter(Mandatory=$True)][string]$ClientName ) Import-Module "c:\Microsoft Configuration Manager\AdminConsole\bin\ConfigurationManager.psd1" cd $SiteCode":" foreach ($Collection in $Collections) { Get-CMDevice -CollectionName $Collection | select Name | ForEach-Object ` { if ( $_.name -eq $ClientName) { Remove-CMDeviceCollectionDirectMembershipRule -CollectionName $Collection -ResourceName $ClientName -Force Send-MailMessage -From OSDActuallyCompleted@domain.com -Subject "Unit $ClientName has completed imaging and has been removed from the AnalystImaging Collection." -To Important@domain.com, AlmostAsImportant@domain.com -Body "Unit $ClientName has completed imaging and has been removed from the HelpDeskImaging Collection." -Cc someone@domain.com -SmtpServer your.server.com } } } |
I bet you saw the reference up there to the cred.txt file. You need to create that unless you like being terrible at securing anything. This is really just ripped right from Ryan Norton's page:
Make sure you have PSExec on the system.
- Open a Administrative Command Prompt.
- Run: "PSExec -i -s powershell.exe"
- Enter: "Read-Host -AsSecureString | ConvertFrom-SecureString | Out-File C:\Scripts\Cred.txt"
- Nothing will prompt you. Type the password for the Domain\SVC-SCCM-RemovalAdmin. Followed by the enter key. Very. Carefully.
Now time to jump into the SCCM Console.
Create a Collection you want to be the place people put Devices to be imaged (HelpDeskImaging).
Give the users the rights and scope to add devices to that collection. This is where you can use limiting collections to then prevent certain servers from being moved into this collection to be re-imaged. Deny beats Allow!
Create a new Security role by going to, Administration Tab - Security - Security Role. You can call it "CollectionEditor" giving only Collection Read and Modify rights. Chose appropriate Security Scope to include the Collection you want to work with (HelpDeskImaging).
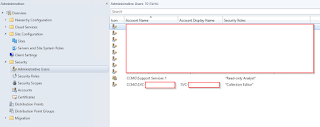
Jump over to the Administration Tab - Security - Administrative Users and add the "SVC-SCCM-RemovalAdmin" account there, giving it the "Collection Editor" role. Assign security scope here if needed.
So now we have the account added, it can now actually remove members from the Collection (kinda). But it needs to be triggered.
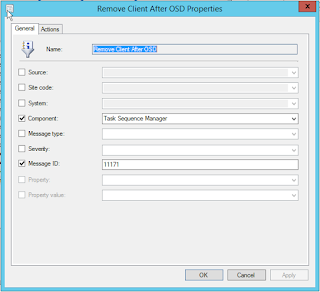
Head to Administrative Tab - Sites - Highlight your Site - Status Filter Rules.
Task Sequence Manager must be typed. It isn't on the drop down. Message ID must be 11171.
You can specify a Property + Property ID to have this only trigger for certain OSD deployments in that collection. Leave it blank to trigger on all completions within that collection(s).
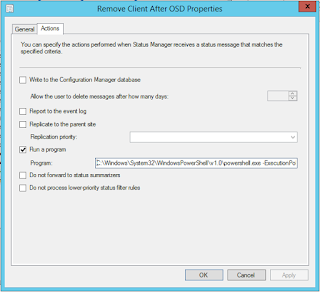
Under Actions you'll need "Run a Program" filled out. Remember to use the right path for the script.
001
|
C:\Windows\System32\WindowsPowerShell\v1.0\powershell.exe -ExecutionPolicy ByPass -File c:\Scripts\CollectionRemovalScript\CallScriptAsOtherUser.ps1 -Collections HelpDeskImaging -SiteCode %msgsc -ClientName %msgsys
|
So keep in mind, the script is going to run on any completion which is triggered either for any completion (just Message ID), or specific ones (If you added Property + Value).
What changes the script sending the email or not is how you have Collections chosen in the "Run A Program" Action within the Status Message.
That's it! You should be getting alerts!
There are some nice troubleshooting links in the two links I posted above, and plenty more below.
Here are a bunch more for inspiration, troubleshooting and other methods!
http://www.systemcenterdudes.com/239/
http://www.petervanderwoude.nl/post/tweeting-the-deployment-status-of-a-system-via-orchestrator-and-configmgr-2012/
https://anothermike2.wordpress.com/2014/06/13/osdusing-ztisendmail-to-send-email-in-a-ltizti-task-sequence/
https://sccmfaq.wordpress.com/2013/05/20/sccm-2012-sp1-remove-client-from-collection-after-osd/
http://scug.be/sccm/2010/10/01/configmgr-osd-task-sequence-success-or-failure-notification/
http://servertechs.info/remove-client-from-collection-after-successful-sccm-task-sequence-powershell/


No comments:
Post a Comment